Installing a large fiberglass animal sculpture is part creative work and part careful planning. Its size, shape, and weight can make a calm day feel complicated once the crate arrives. Wind, uneven ground, narrow access paths, and hidden utilities all deserve attention before the sculpture is moved. How to install a large fiberglass animal sculpture? Start by treating the site, foundation, lifting plan, and manufacturer’s instructions as one connected project. A beautiful finish cannot compensate for an unstable base. Small details matter.
These ten tips will guide you through preparation, transport, positioning, anchoring, and final inspection. Measure the route, check the ground, and confirm how the sculpture is meant to be lifted. Fiberglass can be durable, but edges and painted surfaces may still be scratched or stressed by poor handling. Use suitable lifting equipment and involve qualified professionals when the sculpture’s size or site conditions require them. Do not rush. One useful lesson is easy to overlook: plans often change when the piece is on site. Allow room to adjust, and stop if the load shifts or the foundation differs from expectations. The right installation method depends on the sculpture and location, so verify details with its supplier or a structural professional. A careful setup helps the animal look at home—and stay secure.
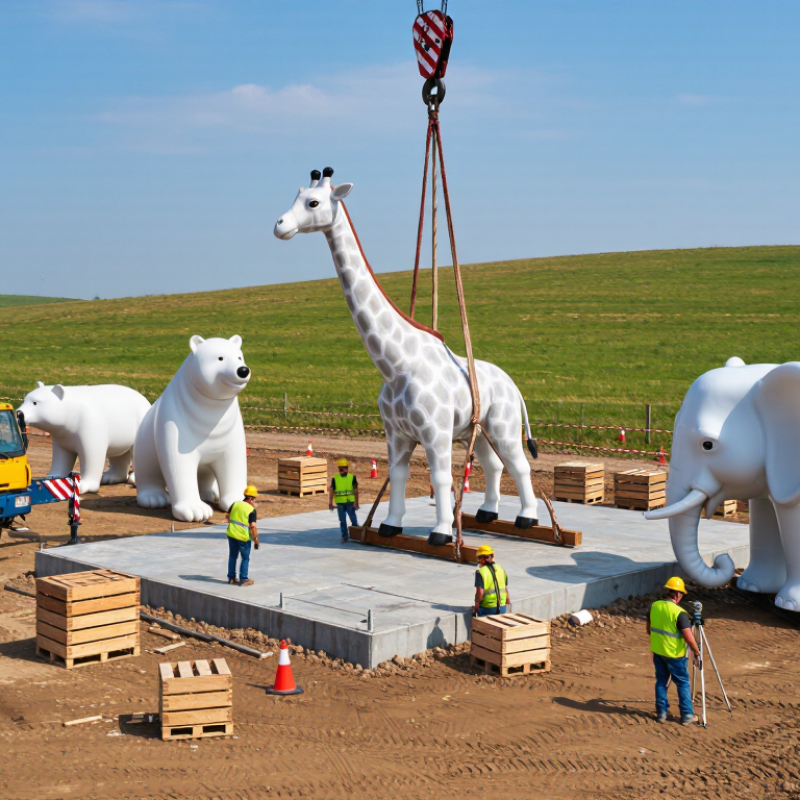
Before a large fiberglass animal sculpture arrives, walk the full route from unloading point to final position. Measure gate widths, turning space, overhead clearance, slopes, and doorway heights; record the narrowest point, not just the average. A 3.2-meter crate may clear a gate but fail at a tight corner. Check whether paving, drains, or soft soil can support the delivery vehicle, crane outriggers, and temporary supports. Ask the lift contractor to confirm ground-bearing requirements and equipment reach. Guessing is not a site assessment.
The U.S. Bureau of Labor Statistics reported 1,075 fatal work injuries in construction in 2023, underscoring why access and lifting plans deserve careful review. That figure covers the whole industry, not sculpture installations specifically. Still, it is a useful reminder to control hazards: mark overhead cables, isolate pedestrian routes, and plan where the load will pause. Wind also matters; a broad sculpture can catch gusts even when its weight seems manageable. Check forecast limits with the rigging team, and identify a safe holding area if conditions change. Small details get missed. A drain cover may look solid but need verification. Photograph the route, note measurements, and revisit the plan after the delivery vehicle’s dimensions are confirmed.
A large fiberglass animal sculpture needs a foundation suited to its weight, shape, and location. Check the soil, slope, drainage, and exposure to wind before choosing a slab, footing, or other support. A sculpture placed on soft ground may tilt after heavy rain. Small shifts matter.
Measure the sculpture’s base and locate its reinforced mounting points. Do not assume the fiberglass shell can carry concentrated loads; thin laminate may crack around an improvised bolt. Use the maker’s installation drawings when available, and have a qualified structural professional review the foundation and anchoring plan for local soil and wind conditions. This step can feel overly cautious. It is cheaper than repairing a split base.
Set anchors accurately before the concrete cures, and confirm that their spacing matches the sculpture’s mounting plate. Keep metal hardware compatible with the site’s moisture conditions, and prevent water from pooling around the footing. Dry-fit the sculpture before final tightening. Use broad washers or specified plates where appropriate, and tighten fasteners evenly rather than forcing one side down. Check that the sculpture sits level, then inspect the anchors after installation and following severe weather. A slight wobble deserves attention, even if it looks harmless.
| Tip | Foundation and Site Considerations | Anchoring and Installation Guidance | Key Check Before Installation |
|---|---|---|---|
| 1. Assess the ground conditions | Check for soft or recently filled soil, poor drainage, buried services, and signs of settlement. Soil strength and groundwater conditions affect foundation design. | Do not select anchor size or embedment depth from sculpture dimensions alone; the supporting ground and design loads also matter. | For a large, exposed, or publicly accessible sculpture, obtain a site assessment from a qualified geotechnical or structural professional. |
| 2. Account for wind and overturning | A sculpture’s height, shape, projected area, and exposure can create substantial wind forces and overturning moments. | Design the footing, base plate, and anchors as one load-resisting system. Consider wind uplift, sliding, and overturning—not just the sculpture’s weight. | Use the wind and other environmental loads required by the building regulations applicable to the installation site. |
| 3. Match the foundation to the site | A reinforced concrete pad, strip footing, or drilled pier may be suitable depending on the soil, sculpture, and site layout. | Foundation depth, width, thickness, and reinforcement should be determined by design calculations rather than a universal rule of thumb. | Confirm that the foundation can resist bearing failure, sliding, overturning, and excessive settlement. |
| 4. Check frost and drainage conditions | In areas subject to freezing, frost-related ground movement can affect shallow foundations. Standing water can also weaken or erode supporting soil. | Where required, place the foundation below the locally specified frost depth or use an engineered frost-protection detail. Grade the surrounding surface to drain water away. | Verify local frost-depth requirements and avoid directing roof, irrigation, or surface runoff toward the footing. |
| 5. Plan the base plate and anchor layout | Confirm the sculpture’s support points and the footprint of its base before forming or pouring the foundation. | Use a dimensioned template to position anchor bolts or inserts. Check bolt spacing, edge distances, projection, and base-plate fit against the approved design. | Dry-fit the template and verify orientation and clearances before concrete placement; misplaced anchors can prevent proper installation. |
| 6. Select anchors for the actual loads | Anchor selection depends on the concrete, base plate, load direction, exposure, and required durability. | Cast-in anchors or post-installed anchors may be used when designed for the application. Specify anchor material and corrosion protection for the site conditions. | Follow the anchor manufacturer’s installation requirements and the project design for anchor type, diameter, embedment, and edge distance. |
| 7. Protect fiberglass from concentrated stress | Fiberglass is a composite material, and its local strength depends on its laminate construction and support details. | Transfer loads through designed internal supports, mounting pads, or a subframe. Use suitable washers or plates where specified, and avoid overtightening fasteners against the shell. | Confirm that the anchoring loads are carried by reinforced structural areas, not by an unsupported section of the fiberglass skin. |
| 8. Use suitable concrete and placement practices | Concrete strength, reinforcement, dimensions, and placement should match the engineered foundation design. | Place and consolidate concrete carefully around reinforcement and cast-in anchors. Keep anchors aligned and secure while the concrete is placed. | Protect fresh concrete during curing. Do not load the foundation until it has achieved the strength required by the design and project specifications. |
| 9. Install and tighten in a controlled sequence | Before lifting, confirm that the foundation is sound, the mounting surfaces are level, and the access route can accommodate the sculpture and lifting equipment. | Use a planned lifting method and rated rigging. Tighten fasteners evenly to the specified torque, using approved washers, nuts, and any required locking method. | Keep personnel clear of suspended loads and follow the lift plan, equipment instructions, and site safety procedures. |
| 10. Inspect and maintain the installation | Outdoor installations are exposed to weather, vibration, temperature changes, and possible impact. | Inspect the base, anchors, visible concrete, and fiberglass around mounting points after installation and periodically thereafter. | Look for loose fasteners, corrosion, cracking, movement, water pooling, or laminate damage; have any structural concern assessed promptly. |
Important: These tips are general planning guidance, not a substitute for project-specific engineering. Foundation and anchoring requirements vary with sculpture geometry and weight, soil conditions, wind and seismic loads, local regulations, and the fiberglass support design.
Before transport, measure the sculpture, crate, doors, turning space, and unloading route. Photograph its center of gravity and approved lifting points, if documented. Fiberglass shells can flex or crack when straps compress thin surfaces. Use a padded cradle and rated restraints around supported areas, not decorative limbs. Check the vehicle’s load capacity and secure the piece against movement. Small shifts matter. The U.S. Bureau of Labor Statistics recorded 2.6 million nonfatal workplace injuries and illnesses in private industry during 2023; careful handling helps avoid adding preventable incidents to that wider burden.
Plan the lift with a qualified crew, suitable equipment, and one person directing signals. The National Institute for Occupational Safety and Health’s lifting-equation guide uses a 51-pound load constant only under ideal two-handed conditions; reach, twisting, and poor grip reduce recommended loads. That is not a safe-lifting allowance for an awkward sculpture. Keep the load low, move slowly, and clear people from its path. At the site, confirm ground firmness, slope, overhead clearance, and wind exposure before unloading. Use tag lines where appropriate, then lower onto prepared supports and check level and stability before releasing the rigging. A detail I might overlook is wind: broad forms can behave like sails, even during a short placement.
Before assembly, inspect the sculpture, base, and supplied hardware for cracks, distortion, or missing parts. Dry-fit every section on a padded, level surface. Check that molded edges meet without force. Fiberglass can chip under pressure. Do not guess. If holes or inserts do not align, stop and contact the fabricator before drilling or trimming.
Use the designated lifting points and a controlled lift; never pull on fins, ears, or other thin details. Keep hands clear while sections are lowered into place. Fit the specified bolts and washers, tightening them evenly with hand tools. Over-tightening can crush the laminate around an insert. Follow the sculpture’s installation instructions for joint sealant, since incompatible products may stain or weaken the surface. A second person can watch alignment and catch small shifts.
Secure the base to a sound, level foundation with anchors rated for the sculpture and site conditions. Wind exposure, soil, and the sculpture’s height all affect anchoring needs; have a qualified structural professional review unusual or exposed installations. That matters. Recheck fasteners after the sculpture is upright, then inspect joints and the base for movement. I once assumed a snug fit meant a secure fit. It did not. A careful final check is worth the extra time.
After installation, inspect the sculpture’s anchors, seams, and surface before the crew leaves. Photograph each side and the base, then record visible cracks, loose hardware, sharp edges, or movement. Check again after the first strong wind or heavy rain. Small changes matter: a widening seam near a mounting point can signal stress, not just a cosmetic flaw.
Set a written maintenance schedule based on local exposure. A practical starting point is a close visual check every six months, plus checks after severe weather; shorten the interval near coastlines or where the sculpture faces intense sun. NOAA’s UV Index classifies 6–7 as high and 8 or above as very high. That scale measures human UV risk, not fiberglass aging, but it helps flag periods of intense exposure. Wash dirt with mild soap and water, and avoid abrasive pads that can dull the gelcoat.
Record repairs, products used, and photographs in one maintenance log. FHWA’s National Bridge Inspection Standards generally set a 24-month maximum interval for routine bridge inspections, but that is not a sculpture requirement. It does show why inspection intervals should be explicit. Review the sculpture’s condition at each visit, and revise the schedule if cracks, fading, or loose fixings recur. Plans can miss things. A log makes that visible.
Measure gates, doorways, corners, slopes, and overhead clearance. Record the narrowest point. A large crate may fit through a gate but fail at a tight turn.
Check paving, drains, and soft ground along the route. Ask the lifting crew to verify ground support and equipment reach. A drain cover may need closer inspection.
Broad fiberglass forms can catch wind, while thin shells may crack under tight straps. Use padded support and secure the piece around strong, supported areas.
Confirm the sculpture’s dimensions, center of gravity, and approved lifting points, if documented. Check the vehicle’s capacity and secure the load against movement.
Use a qualified crew and suitable equipment. One person should direct signals, while other workers stay clear of the load’s path.
Keep the load low and move slowly. Use tag lines when suitable, then lower it onto prepared supports and check its level and stability.
Check wind exposure before unloading and placing the sculpture. A broad shape can act like a sail. I might underestimate a short gust.
Pause the work and review the route, ground, and forecast with the crew. Choose a safe holding area. Plans need another look.
Installing a large fiberglass animal sculpture begins with a careful assessment of the site. Check the ground, weather exposure, available clearance, and access routes to ensure the sculpture can reach its final location safely. Select a stable foundation suited to the sculpture’s size and weight, and plan an anchoring system that can resist expected movement and environmental conditions.
How to install a large fiberglass animal sculpture? Plan transport, lifting, and positioning in advance, using suitable equipment and clear communication among everyone involved. Follow the sculpture’s assembly requirements, align its sections carefully, and secure all joints and anchors before removing lifting supports. After installation, inspect the structure for movement, damage, or loose connections. Establish a regular maintenance plan that includes cleaning and checking the surface, fasteners, foundation, and anchors so problems can be addressed early.
